The Sound-Following Robot

“What do you want to get Nick for Christmas?” “A robot!” My daughter was adamant that her big brother needed a robot for Christmas. I hit the ‘net, and found many robots. I wanted to give him something that actually worked, that was educational, and that was affordable. Because watching Dad solder is no fun, I also ruled out anything that required soldering. That narrowed it down to two choices. “Which one do you want to give to Nick, Sally?” I asked, and started to explain their relative merits. “THE BLUE ONE!” And so it was decided that Nick and I would build an Elenco Sound-Following Robot. IMG_6375 
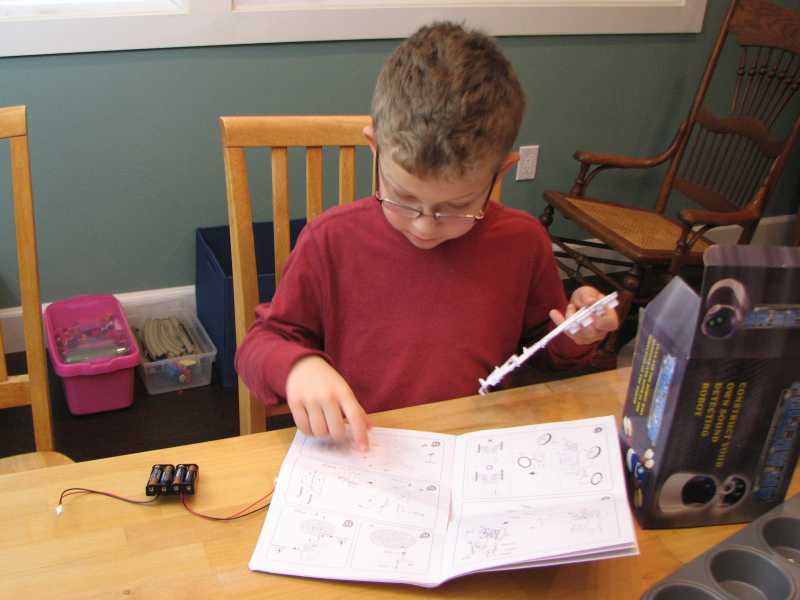
The kit is marketed for kids 13 and up. Nick is still in kindergarten, but loves anything motorized or electronic, so we did it together. The manual used exploded assembly diagrams to show how the pieces went together. Few words are used, and some skill in interpreting drawings is helpful in figuring out the steps. In other words, this was very much a collaborative effort for us. I figured out what went where, he found the parts, and we jointly did the assembly. Though one could probably do the project alone, there certainly were times when it helped to have four hands.IMG_6378 
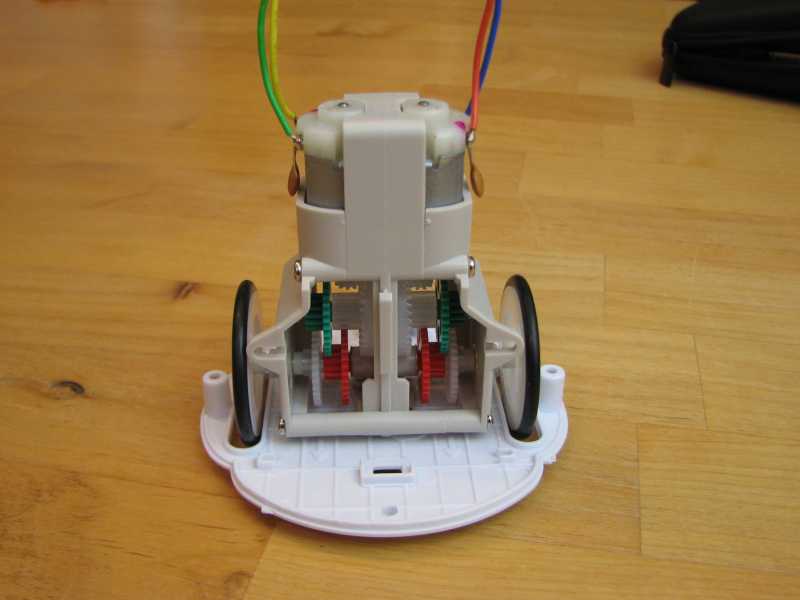
The robot is built around a drive train, the pieces for which are separately bagged. This suggests it’s common to other robot kits. Though the assembly instructions were clear, the gears were fiddly to assemble. At one point, we managed to undo almost all of our previous work when we tried to slip the last gear onto its shaft. No matter; we were able to put it back together. At this point in the assembly, with a drivetrain and a bottom plate, the possibilities of hacking this robot became clear. IMG_6383 
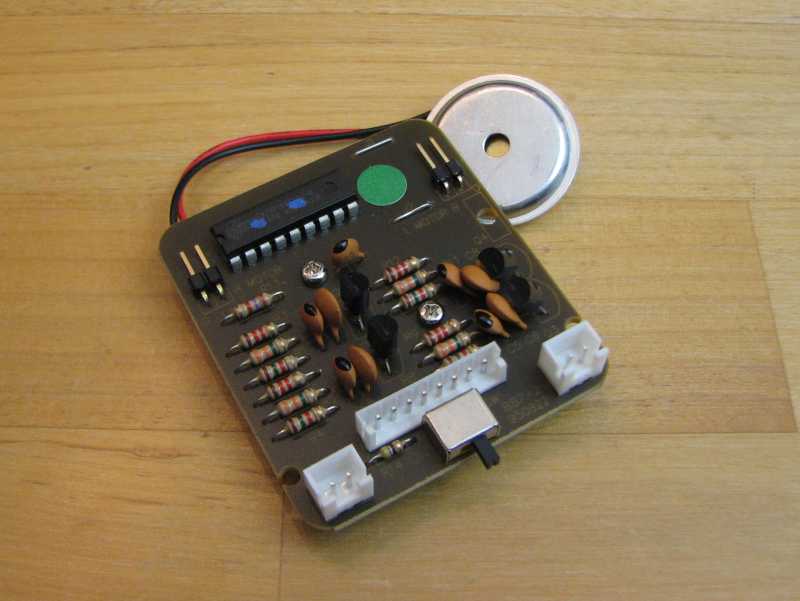
The controller for the robot comes preassembled. The IC on top of the board is a microcontroller. It is house-labelled for Elenco, but I suspect it’s a standard part with custom firmware. The manual has a schematic, so I compared the pinout to PICs and AVRs without finding a match. Maybe it’s a 68HC05 or another small micro. The assembly drawing pictured a socket under the microcontroller, but no such luck on this production unit. (By this time, I was started to get intrigued by the modification possibilities for this little robot.) IMG_6387

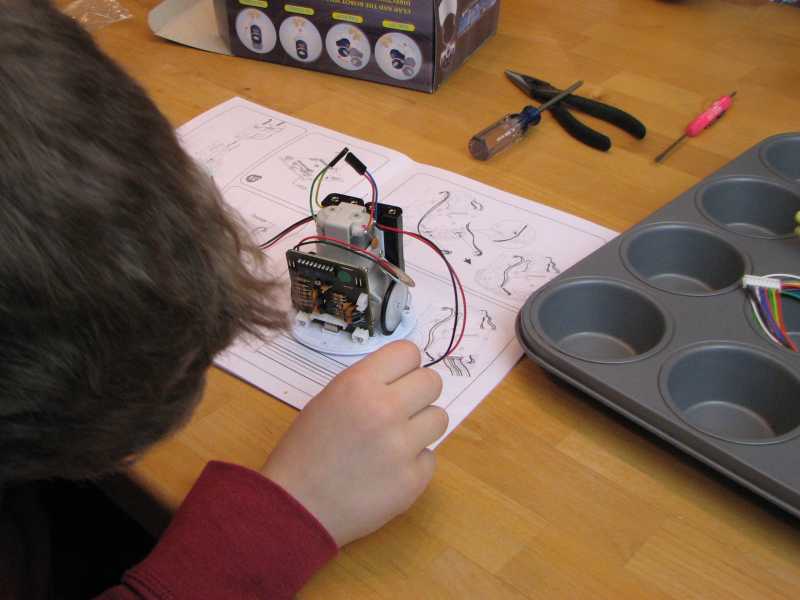
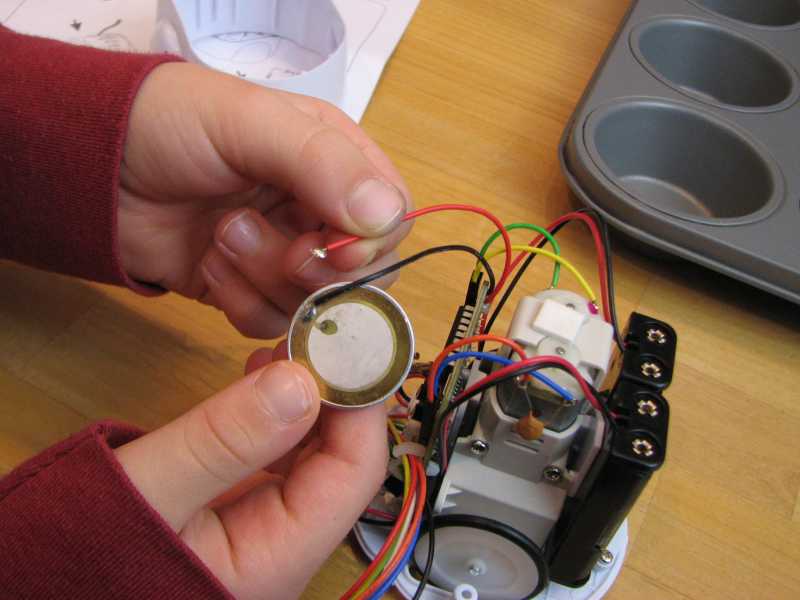
We ran into our first glitch when a lead broke off of the speaker. A trip to Radio Shack turned up another speaker that could be trimmed to fit.

IMG_6390

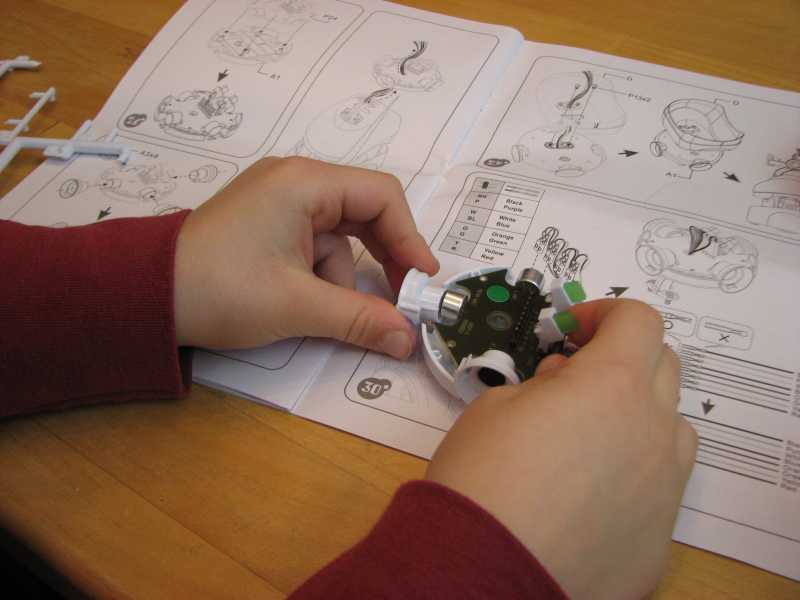
The “head” of the robot has its own PCB ringed by four microphones to detect sound. Two LEDs serve as “eyes” and give feedback on the direction of sound detected by the robot.

IMG_6394

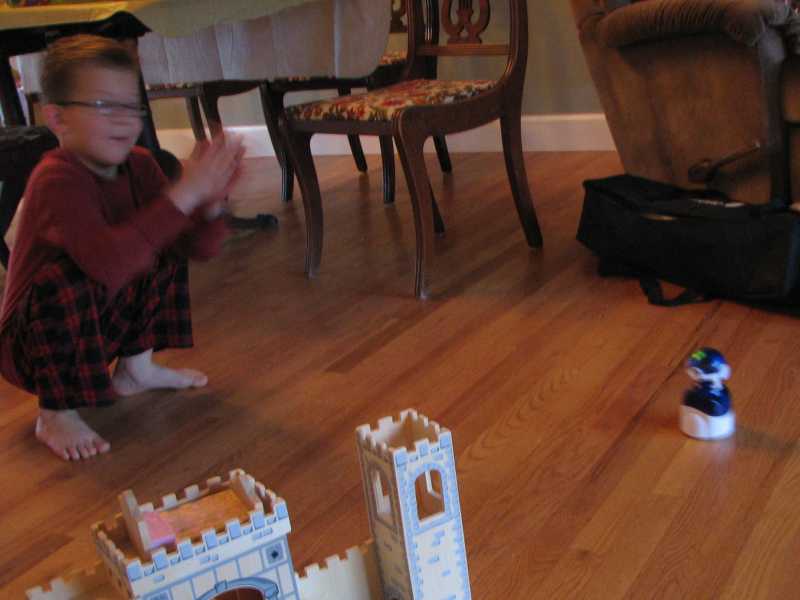
That’s one happy boy playing with his new robot. His mother is a little less excited about it. A sound-following robot likes it noisy. Clap! Clap! Clap! Clap! Clap! Clap! Clap! Clap! Clap! Clap! Clap! Clap! Clap! Clap! Clap! Clap! Clap! Clap! Clap! Clap! Clap! Clap! Clap! Clap! Clap! Clap! Clap! Clap! Clap! Clap! Clap! Clap! Clap! Clap! Clap! Clap! Clap! Clap! Clap! Clap! Clap! Clap! Clap! Clap! Clap! Clap! Clap! Clap! Clap! Clap! Clap! Clap! Clap! Clap! Clap! Clap! Clap! Clap! Clap! Clap! Clap! Clap! Clap! Clap! Clap! Clap! Clap! Clap! Clap! Clap! Clap! Clap! ….

IMG_6396

pQRP

Last night I attended a very enjoyable gathering of the Pacific Northwest QRP (pQRP) group. I’ve been wishing for some time to find a group of like-minded hams. Like-minded, that is, in the sense that they are interested in design and building as well as operation. Imagine my pleasure at hearing from not one, but four hams involved in design projects as well as others enjoying the experimental side of the hobby, even down to one gentleman who is testing an add-on heat sink for his Elecraft KX-3.

Several members of the club are involved in designing and building a variant of Ashhar Farhan’s “Minima” transceiver. They are equipping it with Si570 oscillators and a comfortable user interface, while trying to stay close to the original spirit of the radio. A potentiometer is still the interface for frequency control, for example, instead of a rotary encoder.

Other members of the club are active in operating, including SOTA, RTTY contests, and other pursuits.

As show and tell, I brought along my NorCal 40A, which neither tunes as widely as it should nor outputs full power. So far it has stumped me. The consensus of the group was to post about it to the club mailing list and see who has some ideas to try.

I’m already looking forward to next month’s meeting.

Digging up a Dinosaur – a Boatanchor at the Children’s Museum

Last weekend, I took my children to the Imagine Children’s Museum in Everett, WA. On the roof, my daughter found this National NC-173 as part of a “dinosaur dig” exhibit. It may have been gutted. At the very least, the controls are certainly not original! The colorful, kid-resistant buttons cause a speaker to play a variety of recorded messages, supposedly radio communications with a base camp.

It has been painted so many times, I could hardly identify it. Through the paint, I found an engraved “80”, “40”, and “10-20” by what may have been a band switch. Peering harder, I could just make out the model number.

I’m not a boatanchor guy, and some might bemoan the loss of a historic radio. It made me smile to find it, though, and my daughter enjoyed playing with it. That’s enough for me.

image


When I brought my children to the Imagine Children’s Museum (Everett, WA) last weekend, they showed me the “dinosaur dig” exhibit on the roof. There we found this National NC-173 receiver, of Kon-Tiki fame. It looks like it has been gutted. The controls certainly aren’t original. The brightly-colored, kid-resistant buttons cause it to play recorded messages from a “base camp” to the pretend-paleontologists at the dig.

I had to peer through layers of paint to read the engravings and identify it. The best remaining marking is “80”, “40”, and “10-20” by what may have been a band switch. I could barely find the model number under all the paint.

I’m not a boatanchor guy, and I understand that some might bemoan the loss of a classic receiver. My daughter enjoyed playing with it, though, and it made me smile to find it, so it’s all right with me.

New job, New state, New call

Since my last post in November, my life is dramatically different. I changed jobs and industries, and I moved to the great state of Washington. Squeezed between Puget Sound and the Cascades, and watched over by Mounts Rainier and Baker, it is gorgeous here in the Seattle area. I will always be an Ohio boy, but Washington has been good so far. I even got a new callsign to go with my new address. I’m now KK7ZD.

Relocating is time-consuming beyond belief. The summer has been about unpacking, fix-it jobs, finding our way around our new city, and just a little bit of tourism. I’m waiting for the long, rainy nights of winter to set up my lab and resume work on the “Doan Brook” R2/T2 radio.

My new friends in the Western Washington DX Club are twisting my arm to participate in the Washington Salmon Run QSO party next weekend, though, so maybe I will find a bit of wire and my NorCal 40 and see if I can make some contacts with my new call.

I am considering a change in direction for the Skywired blog. My original vision was for a heavily technical focus on hardware projects, but changes in my life mean those kinds of big projects are less feasible. My career and hobby interests span the space where hardware and software meet, so it may make sense to shift focus slightly to include more software content. I’m not going to abandon electronic projects and in-depth tutorials, just cast a wider net for interesting content.

FDIM 2012: WB9LPU’s QuadraBug fully automatic key

This year’s Four Days in May at the Dayton Hamvention was full of sights to see. One amazing little piece of amateur engineering was Rich Meiss, WB9LPU’s “QuadraBug”, a mechanical key in the spirit of the Vibroplex Bug, but with fully automatic keying of both dits and dahs. (A bug has automatic dits, but manual dahs.)

Tom Perrera has put together a nice overview of Rich’s keys, starting from simple straight keys and working up to novel automatic keys like this.

My mechanical skills are limited. I have a lot of respect for those who can imagine and construct fine machines like this.

FDIM 2012: AA2JZ’s 40m transceiver

At this year’s Dayton Hamvention, I attended the Four Days In May QRP event put on by QRP-ARCI. A number of projects were on display, including this transceiver.

Carl Herbert, AA2JZ designed and built this 40m transceiver, drawing on the NW8020 as a source of inspiration. It uses NE602 mixers and two PIC microcontrollers, and includes a keyer and a frequency counter.

I was impressed by Carl’s tidy Manhattan-style assembly technique, in which small pieces of copperclad board (PCB material) are glued down and used as points to which wires and component leads are soldered. Most impressive is that he used the same technique for the chips. Carl must have a lot of patience to be able to position the little “nibbles” of copperclad at 0.1″ spacing to take the IC leads.

FDIM 2012: A field strength meter built onto a Harbor Freight DMM

Continuing the series on neat projects I saw at the Four Days In May, here is a litle field strength meter built onto the side of a cheap Harbor Freight DMM by Dana Browne AD5VC.

ADC5VC field strength meter

Dana’s inspiration for the little field strength meter came when he was teaching a radio class to college students and wanted to show them the pattern of a Yagi-Uda antenna. He explained that cheap digital multimeters like this Harbor Freight model were readily available in the physics lab, so he built the field-strength circuit and  a little plug-in adapter using the DMM as the readout.

Though I don’t see much need for a field-strength meter in my shack, I admire Dana’s inventiveness in coming up with a solution that is cheap, convenient, and inexpensive.